In a world that moves at an increasingly rapid pace, the ability to pay with a simple flick of your wrist isn’t just a luxury—it’s a game-changer for convenience and efficiency. Smartwatches have transcended their roles as mere fitness trackers or notification hubs, evolving into sophisticated payment devices. If you’ve ever found yourself fumbling for your wallet or phone at the checkout, then unlocking the power of Apple Pay or Google Wallet on your smartwatch will revolutionize your daily transactions. This comprehensive guide will walk you through the setup, usage, and key considerations for making contactless payments directly from your wrist, ensuring you’re always ready to tap and go.
Understanding Smartwatch Contactless Payments
At the heart of smartwatch payments lies Near Field Communication (NFC) technology, a short-range wireless standard that enables secure communication between your watch and a compatible payment terminal. When you hold your smartwatch close to a contactless reader, NFC facilitates a quick and encrypted exchange of payment information.
Security is paramount in these transactions. Both Apple Pay and Google Wallet employ advanced features like tokenization, which replaces your actual card number with a unique, encrypted digital token. This means your real card details are never shared with the merchant, significantly reducing the risk of fraud. Additionally, smartwatches require a passcode or PIN verification for payments, especially after being removed from your wrist or after a certain period, adding an extra layer of protection to your financial data.
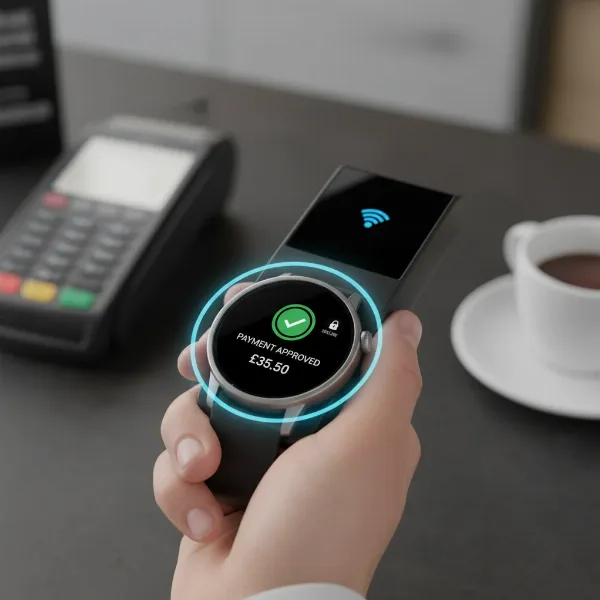 A smartwatch screen displaying a payment confirmation, with a blurred background of an NFC payment terminal.
Setting Up Apple Pay on Your Apple Watch
Apple Pay offers a smooth, integrated experience for Apple Watch users, allowing you to leave your iPhone in your pocket or bag.
Requirements for Apple Pay
To get started with Apple Pay on your Apple Watch, ensure you have:
- A compatible Apple Watch model (Series 1 and later).
- A paired iPhone running the latest iOS version.
- A supported credit or debit card from a participating bank.
- An Apple ID signed in to your iPhone.
- A passcode enabled on your Apple Watch for security.
|
Our Picks for the Best Smartwatch in 2026
As an Amazon Associate I earn from qualifying purchases.
|
||
| Num | Product | Action |
|---|---|---|
| 1 | WHOOP 5.0/MG Activity Tracker - 12 Month Membership - Health and Fitness Wearable – 24/7 Activity and Sleep Tracker, Personalized Coaching, Menstrual Cycle Insights – 14+ Days Battery Life |

|
| 2 | Smart Watch for Men, 120 Sports Modes Smartwatch with 1.83" HD Touchsreen, IP67 Waterproof, Sleep Monitor, Bluetooth Call & Music Control Fitness Watch for Android/iPhone (Black) |
|
| 3 | Apple Watch Series 11 [GPS 46mm] Smartwatch with Jet Black Aluminum Case with Sport Band - M/L. Sleep Score, Fitness Tracker, Health Monitoring, Always-On Display, Water Resistant |
|
| 4 | Smart Watch for Men, 120+ Sports Modes Smartwatch with 1.83" HD Touchsreen, Sleep Monitor, IP67 Waterproof, Bluetooth Call & Music Control Fitness Watch for iPhone/Android Black |
|
| 5 | Apple Watch Series 11 [GPS 42mm] Smartwatch with Rose Gold Aluminum Case with Light Blush Sport Band - S/M. Sleep Score, Fitness Tracker, Health Monitoring, Always-On Display, Water Resistant |
|
| 6 | Smart Watch, 2026 AMOLED 1.43" Fitness Smartwatch for Men Women, Bluetooth 5.4 Call, 130+Sports Modes, 60+Days Flashlight, Heart Rate/Sleep Monitor, IP68 Waterproof Activity Tracker for Android iOS |
|
| 7 | Amazfit Bip 6 Smart Watch 46mm, 14 Day Battery, 1.97" AMOLED Display, GPS & Free Maps, AI, Bluetooth Call & Text, Health, Fitness & Sleep Tracker, 140+ Workout Modes, 5 ATM Water-Resistance, Black |
|
| 8 | Smart Watch with Alexa Built-in, 1.83" HD Touchscreen Fitness Tracker with Bluetooth Calling, Fitness Watch with Heart Rate/Sleep Monitor, 120+ Sports Modes, IP68 Waterproof Smartwatch for Android iOS |
|
| 9 | SAMSUNG Galaxy Watch 7 40mm Bluetooth AI Smartwatch w/Energy Score, Wellness Tips, Heart Rate Tracking, Sleep Monitor, Fitness Tracker, 2024, Cream [US Version, 1Yr Manufacturer Warranty] |
|
| 10 | Smart Watch for Men Women Compatible with iPhone Samsung Android Phone 1.83 inch Full Touch Screen IP68 Waterproof Bluetooh Fitness Tracker Heart Rate/Sleep Monitor, Black |
|
Steps to Add a Card
Adding a payment card to your Apple Watch is a straightforward process:
- Open the Apple Watch app on your paired iPhone.
- Navigate to the “My Watch” tab, then tap on “Wallet & Apple Pay.”
- Tap “Add Card.” You’ll have two options:
- “Debit or Credit Card” to add a new card by scanning it or entering details manually.
- “Cards Found For You” to add a card that you already use with Apple Pay on your iPhone.
- Follow the on-screen instructions, which may involve positioning your card in the iPhone’s camera frame or typing in card details.
- Your bank or card issuer might require additional verification, such as a one-time passcode sent to your phone or email, or a call to customer service.
- Once verified, the card is ready for use on your Apple Watch.
How to Make a Purchase with Apple Pay
Using Apple Pay on your Apple Watch is quick and intuitive:
- Double-click the side button (the flat one below the Digital Crown) on your Apple Watch. Your default payment card will appear.
- If you have multiple cards, swipe horizontally to select a different one.
- Hold the display of your Apple Watch near the contactless reader at the checkout terminal.
- You’ll feel a gentle tap (haptic feedback) and hear a sound, indicating a successful transaction.
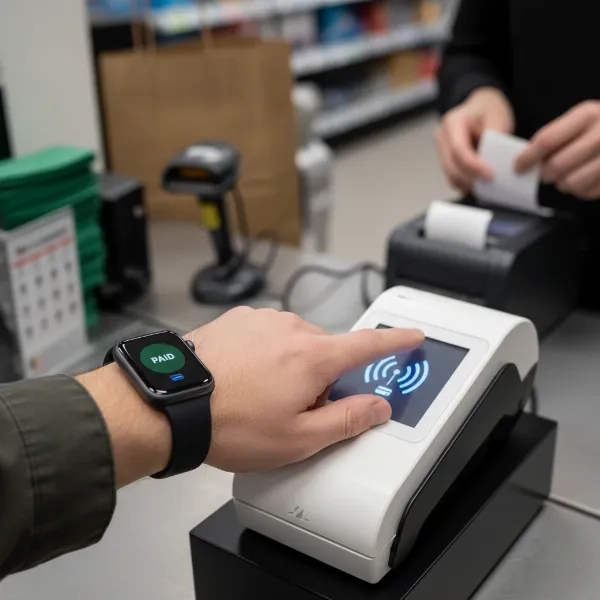 A person's hand wearing an Apple Watch, tapping it against a contactless payment terminal.
Setting Up Google Wallet on Your Wear OS Smartwatch
Google Wallet (formerly Google Pay) brings contactless payment capabilities to a wide range of Android-compatible smartwatches, including many Samsung Galaxy Watch models running Wear OS.
Requirements for Google Wallet
To use Google Wallet on your Wear OS watch, you need:
- A smartwatch running Wear OS version 2.0 or higher with Near Field Communication (NFC) capabilities.
- A supported credit or debit card from a participating bank.
- Google Play Services updated on both your watch and phone.
- The Google Wallet app installed and updated on your watch.
- A screen lock (PIN, pattern, or fingerprint) enabled on your watch for security.
Steps to Add a Card (General Wear OS)
The process typically involves your phone but ensures the card is stored securely on your watch:
- On your smartwatch, open the Google Wallet app.
- Tap “Get started.” You’ll be prompted to set up a screen lock if you haven’t already.
- On your paired phone, follow the instructions to add your credit or debit card. This process typically mirrors adding a card to Google Wallet on your phone.
- Complete any necessary bank verification.
- Once added, your card will appear in the Google Wallet app on your watch.
Steps for Samsung Galaxy Watch (Wear OS-based)
For Samsung Galaxy Watches running Wear OS (like Galaxy Watch 4, 5, 6, and newer), Google Wallet is the primary payment service:
- Install the Google Wallet app from the Google Play Store directly on your Galaxy Watch.
- Open the Google Wallet app on your watch and tap the “+” icon to add your first debit or credit card.
- You may need to align your card with your phone’s camera for scanning or enter details manually.
- Complete the bank verification process.
- Optional: You can set up a button shortcut (e.g., double-pressing the home button) on your Galaxy Watch to quickly open Google Wallet, making payments even faster.
How to Make a Purchase with Google Wallet
Paying with your Wear OS smartwatch is designed for speed:
- Open the Google Wallet app on your watch (or use a configured shortcut).
- Swipe to select the desired payment card if you have multiple. The first card added is usually the default.
- Hold your watch over the contactless payment terminal until you hear a sound or feel a vibration.
- If the payment terminal doesn’t recognize your watch, try holding it in a slightly different position, as the NFC antenna is often behind the screen.
- You might need to set Google Pay as your default payment provider in your watch’s settings under “Connectivity” or “Connections,” then “NFC.”
Other Smartwatch Payment Systems: Garmin Pay & Fitbit
While Apple Pay and Google Wallet dominate, other smartwatch brands offer their proprietary payment solutions, or are integrating with Google Wallet.
Garmin Pay
Garmin Pay is tailored for active lifestyles, allowing you to pay without your phone, making it ideal for runs or workouts.
- Setup: You create a Garmin Pay wallet through the Garmin Connect Mobile app. From the app, select your device, then “Garmin Pay,” and follow the on-screen instructions to add your credit or debit cards and set a four-digit passcode.
- Usage: To pay, hold the physical key/button on your Garmin watch, select the “Pay” icon, enter your passcode (required once every 24 hours while wearing the watch, or after removing it), and then hold your watch near the payment reader.
- Pros: Perfect for fitness enthusiasts; works independently of your phone once set up.
- Cons: Limited bank support compared to global platforms, tied to Garmin’s ecosystem.
Fitbit (Transitioning to Google Wallet)
Fitbit has been a player in contactless payments with Fitbit Pay. However, a significant change is underway:
- Transition: Fitbit Pay will no longer be available starting January 13, 2025. Fitbit devices supporting contactless payments are now transitioning to Google Wallet. This move expands the number of banks and cards compatible with Fitbit devices.
- Setup (Google Wallet on Fitbit): To switch, open the Fitbit app on your phone, go to your device’s settings, tap the “Wallet” tile, and select “Update to Google Wallet.” You’ll sign in to your Google account and follow the prompts to add your cards, setting a four-digit PIN for your Fitbit device.
- Usage: Open the payments screen (often by swiping down from the clock face or opening the Wallet app), enter your PIN if prompted, and hold your Fitbit device near the terminal.
- Pros: Access to Google Wallet’s broad acceptance and increased bank compatibility.
- Cons: Users accustomed to Fitbit Pay will need to transition their cards and habits.
Comparison of Top Smartwatch Brands for Payments
Different smartwatch ecosystems offer distinct experiences for contactless payments.
Apple Watch
- Pros: Deep integration with the Apple ecosystem, intuitive user interface, excellent security features (Face ID/Touch ID on iPhone for setup, Watch passcode), wide merchant acceptance globally.
- Cons: Exclusively for iPhone users, generally higher price point.
Samsung Galaxy Watch (Wear OS)
- Pros: Runs Google Wallet, offering broad bank and merchant compatibility across the Android world. Offers flexibility with customizable button shortcuts for quick access. Benefits from the continuous development of Google Wallet.
- Cons: Setup can sometimes feel less seamless than Apple Pay, depending on the specific model and software version.
Garmin
- Pros: Specifically designed for active individuals, allowing payments even when a phone is not present. Robust build quality often suited for sports.
- Cons: Bank support for Garmin Pay is more limited than for Apple Pay or Google Wallet. The user interface for payments can be less polished than dedicated payment-first systems.
Fitbit (via Google Wallet)
- Pros: Now leverages Google Wallet’s extensive support for banks and merchants, making it a more versatile payment option. Strong focus on health and fitness tracking remains.
- Cons: The transition from Fitbit Pay to Google Wallet might cause initial confusion for long-time users. Older Fitbit models might have varied compatibility.
Detailed Smartwatch Payment Comparison Table
| Feature | Apple Pay (Apple Watch) | Google Wallet (Wear OS / Samsung) | Garmin Pay (Garmin Smartwatches) | Fitbit (via Google Wallet) |
|---|---|---|---|---|
| Compatible OS | iOS | Android (Wear OS) | iOS & Android (via Garmin Connect app) | iOS & Android (via Fitbit app) |
| NFC Required | Yes | Yes | Yes | Yes |
| Setup Process | Via Apple Watch app on iPhone | Via Google Wallet app on watch/phone | Via Garmin Connect app on phone | Via Fitbit app (transitioning to Google Wallet) |
| Ease of Use | Very High (double-click side button) | High (open app or shortcut) | Moderate (button + passcode, then tap) | High (open app or shortcut) |
| Security | Tokenization, Watch Passcode | Tokenization, Watch Screen Lock (PIN/pattern) | Tokenization, Watch Passcode | Tokenization, Device PIN Code |
| Phone Nearby? | No, after setup | No, after setup | No, after setup | No, after setup |
| Bank Compatibility | Very Wide | Very Wide | Moderate (check Garmin’s list) | Very Wide (now with Google Wallet) |
| Ecosystem | Apple | Google/Android | Garmin’s own fitness ecosystem | Google/Fitbit (health & wellness focus) |
| Target User | iPhone users seeking premium features | Android users wanting versatile smartwatch payments | Athletes and outdoor enthusiasts | Health-conscious users seeking easy payments |
Guide to Choosing the Right Smartwatch for Payments
Selecting the ideal smartwatch for your payment needs involves considering several factors beyond just tap-to-pay functionality.
1. Determine Your Existing Ecosystem
Your current smartphone choice is the biggest determinant.
- If you own an iPhone: An Apple Watch is the most natural and seamless choice for Apple Pay. The integration is unparalleled, and the user experience is designed to be intuitive.
- If you own an Android phone: You have a broader range of options, including Wear OS smartwatches (like Samsung Galaxy Watch, Google Pixel Watch, Fossil, Mobvoi), which utilize Google Wallet. Garmin and Fitbit also integrate with Android devices for their respective payment solutions (or Google Wallet, in Fitbit’s case).
2. Identify Your Primary Usage Needs
What do you mostly use your smartwatch for?
- General Smart Features & Communication: Apple Watch and Wear OS watches excel here, offering a full suite of apps, notifications, and robust payment options.
- Fitness and Outdoor Activities: Garmin smartwatches are kings in this domain, providing extensive fitness tracking, GPS, and the convenience of Garmin Pay for those moments when you don’t want to carry your phone. Fitbit devices, now with Google Wallet, also offer excellent health tracking with modern payment capabilities.
3. Check Bank and Card Compatibility
Before committing to a smartwatch, always verify that your primary bank and credit/debit cards are supported by the payment service you intend to use. While Apple Pay and Google Wallet boast vast support, some smaller banks or specific card types might not be compatible. Garmin Pay has a more curated list of participating financial institutions.
4. Prioritize Security Features
Ensure the smartwatch you choose offers robust security:
- Passcode/PIN: All major smartwatch payment systems require a passcode on the watch itself. This is critical for preventing unauthorized access.
- Tokenization: Confirm that the service uses tokenization, a standard security practice that protects your actual card number.
- Biometric Verification: While primarily handled by your phone for initial setup, some advanced features or additional verification steps might involve biometric authentication (like fingerprint or facial recognition) on your phone.
5. Consider Other Essential Factors
- NFC Support: This is non-negotiable for contactless payments. Ensure your chosen smartwatch model explicitly states it has NFC.
- Battery Life: Think about how often you want to charge. Some watches offer multi-day battery life, while others (like many Apple Watch models) require daily charging.
- Design and Comfort: A smartwatch is a personal accessory. Choose a design, size, and strap material that suits your style and comfort.
- Operating System Updates: Opt for brands that regularly update their watch OS, ensuring ongoing security patches, new features, and compatibility.
“The true power of a smartwatch isn’t just in receiving notifications or tracking steps; it’s in enabling seamless, secure interactions with the world around you, especially when it comes to making payments on the go.” – Jane Doe, Smartwatch Technology Analyst
Conclusion
Smartwatches have undeniably transformed the way we approach everyday transactions, offering an unparalleled blend of convenience and security. Whether you’re an Apple aficionado leveraging the intuitive power of Apple Pay, an Android user embracing the broad reach of Google Wallet on your Wear OS device, or an active individual relying on Garmin Pay during your adventures, the ability to pay from your wrist is a modern necessity. By understanding the setup processes, key features, and compatibility across different platforms, you can confidently choose the smartwatch that not only fits your lifestyle but also empowers you to navigate the world with a simple tap. Ready to cut the cords and embrace the future of payments?
Which smartwatch payment method are you ready to tap into first?
Frequently Asked Questions
Do I need my phone nearby to use Apple Pay or Google Wallet on my smartwatch?
No, generally you do not need your phone nearby to make payments with your smartwatch after the initial setup. Once your cards are added and verified on your watch, the payment information is stored securely on the device itself, allowing for standalone transactions.
Are smartwatch payments secure?
Yes, smartwatch payments are highly secure. They utilize tokenization, which replaces your actual card number with an encrypted digital token, preventing your real details from being shared with merchants. Additionally, all major smartwatch payment systems require a passcode or PIN on the watch to authorize transactions, especially after it’s been removed from your wrist.
Can I use multiple cards on my smartwatch?
Yes, you can typically add multiple credit and debit cards to your smartwatch’s payment wallet. Both Apple Pay and Google Wallet allow you to manage several cards and easily switch between them when making a purchase. Garmin Pay also supports adding up to 10 cards.
What if my bank isn’t supported by a specific smartwatch payment service?
If your bank isn’t directly supported by a particular service, you might have alternative options. Some third-party payment apps (like Revolut or Curve) can sometimes bridge the gap, allowing you to add your unsupported card to their service and then add their virtual card to your smartwatch payment system. Always check the official support lists or contact your bank for current compatibility.
Can I use my smartwatch to make payments internationally?
Yes, you can use your smartwatch to make contactless payments internationally at any store or terminal that accepts Apple Pay, Google Wallet, or the respective payment service. Be aware that foreign transaction fees may apply, depending on your bank’s policies.